Welcome to Tasty Pins!
Tasty Pins requires some straightforward setup, and then it just works! The magic happens within your posts, where you can add extra information to your images to help your content stand out on Pinterest.
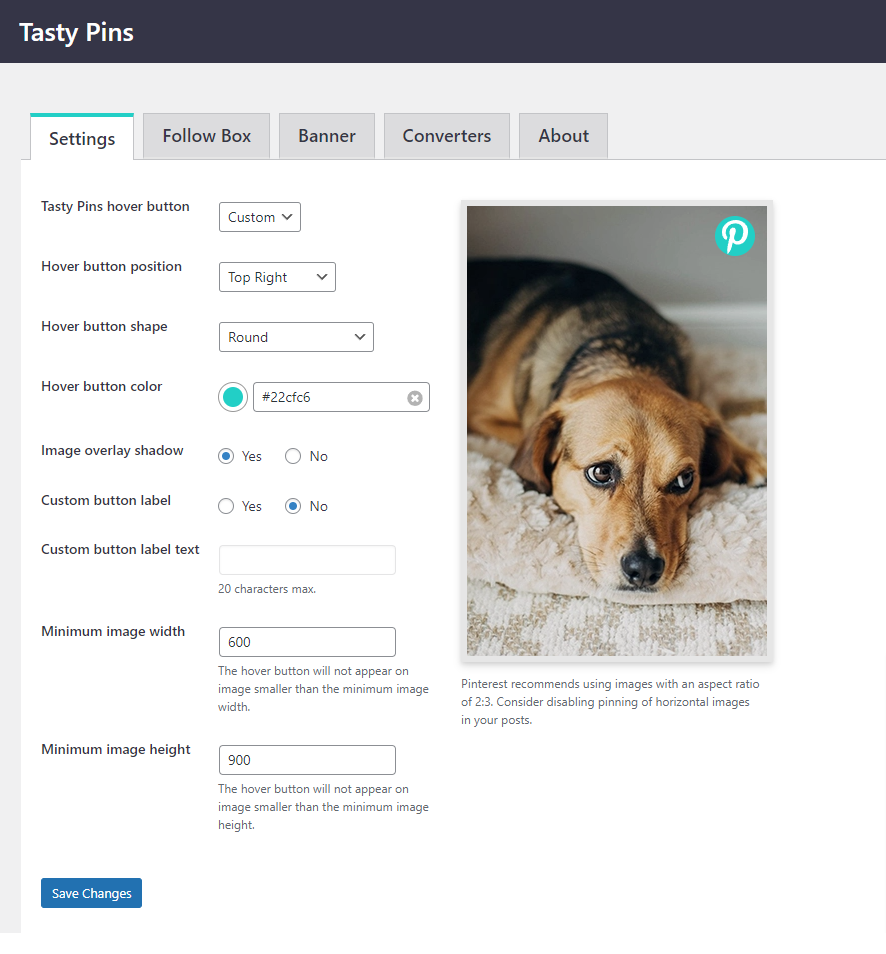
Tasty Pins Settings Tab
In the Tasty Pins settings, you’ll find everything you need to set the style and placement of your Pinterest hover button. Quickly and easily limit where your hover buttons appear with the minimum width and height settings.
Tasty Pins hover button lets you select from 3 choices:
- Custom hover button allows for more options, including shape and placement, which we’ll cover in a few.
- Default is your most basic pin button.
- Off disables all Tasty Pins pin buttons. Great when you want to use the functionality but perhaps have conflicts with other social plugins on your site.
So let’s assume you’ve decided to go with the custom hover button. From there, you can select the hover button position and hover button shape.
The hover button color allows you to utilize your brand's colors. In the image above, we're using WP Tasty's blue color, #22cfc6.
Image overlay shadow: Turn on or off a slightly darker image overlay when visitors hover over a pinnable image.
Custom button label: Add up to 20 characters of custom text to your pin button.
Minimum image width and height: disable pinning for smaller images on your site, like logos, post thumbnails, and profile pictures. Keep in mind every theme is a little different and if this feature isn’t working for you, please reach out to support. That way, we can try to troubleshoot the issue.
Tasty Pins Follow Box Tab
In the Follow Box tab of Tasty Pins, you can turn on this modal for your site. That way, your readers have the opportunity to follow you on Pinterest. Plus, you get to use your increased Pinterest follower count as bragging rights in your media kit!
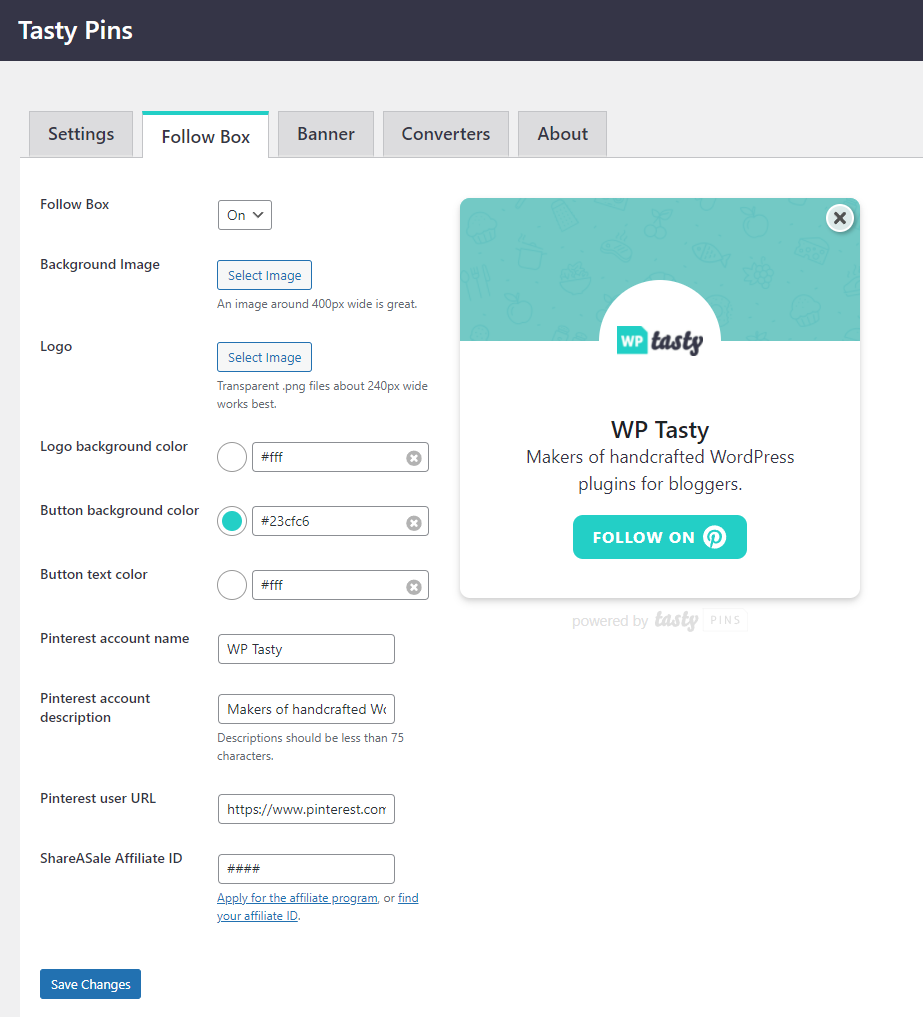
Follow Box: The very first option you see is the follow box. All you need to do is toggle that on so you can start getting those Pinterest followers!
Background Image: You can add a background image that makes sense for your site. In the past, we took a screenshot from our Pinterest account (in the “Created” section), cropped it above our Pinterest profile image, then used that as our follow box's background image.
Logo: This is where you will add your logo for your follow box. A transparent .png file works best. We recommend keeping it about 240px wide. The logo will not fill up the whole circle. The next part will fill out the rest of the logo's circle.
Logo Background Color: Since your logo will not fill up the entire circle, you'll want to choose a background color. For us, we're using white (#fff).
Button Background Color: For your modal's follow button, pick a color that matches up with your brand colors and draws attention to your readers. We used our blue color again for this button (#22cfc6).
Button Text Color: We recommend using a color that pops against your button's background color. Is your background color dark? Use a light text color. Your background color is light? Use a dark text color! The color contrast helps accessibility and generally makes it easier for your site's visitors to read the button.
Pinterest Account Name: How do you want to be referenced on Pinterest? For us, we're using “WP Tasty” so our followers know exactly whose pins they're checking out.
Pinterest Account Description: Consider this your tagline or a 2-second elevator pitch. Give them enough information to know your site's purpose, but keep it short.
Pinterest User URL: This is where you grab your Pinterest account's URL. WP Tasty's is https://www.pinterest.com/wptasty and is what we placed in this box. When you include your Pinterest URL, this will take your readers to your profile so they can follow you.
ShareASale Affiliate ID: Are you a WP Tasty affiliate program member? Use this spot to your advantage so you can make some extra cash! Haven't applied yet because you have more questions? Check out our Frequently Asked Questions about the program.
Learn more: Pinterest Follow Box
Tasty Pins Banner Tab
Instead of using a hover button on your very first pinnable image in your post, opt for using the Pin Banner! The banner creates a call-to-action for your readers to pin your post – and that's what we all want, right?
You watched the video, but you prefer to read about how to use it instead? No worries! We got you. We know everyone's learning style is a bit different!
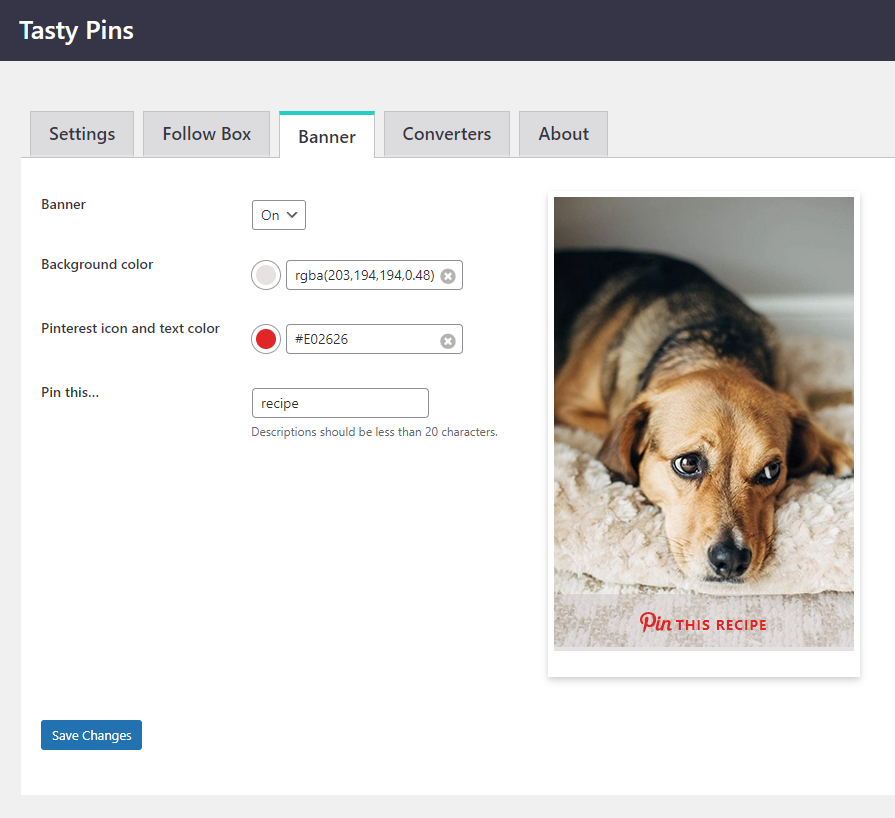
Banner: First thing's first – toggle that to “On.” We know you want to test this feature out!
Background color: Choose one of your site's colors that you'd like to use behind the banner's text. Not only can you use your brand color, but you can also change the opacity to your liking. When you adjust your opacity, your background color will take on the RGBA color codes instead of the usual hex color codes.
Pinterest Icon and Text Color: Add your brand color here to change the color of the banner's message. Or, feel free to use Pinterest Red here (#e60023).
Pin this…: Decide what you'd like to use on your pin banner here. Remember, this is a global message (meaning it will be on all pin banners throughout your posts). Some people use “recipe” in theirs. Others may use “craft” or “project.” Got a little bit of everything on your site? Maybe “post” will work best for you. Your choice on how you'd like that banner to read!
Want to see the banner feature in action? Pinch of Yum makes their background slightly transparent, but it still helps make the banner text pop on their images!
Tasty Pins Converter Tab
So far, Tasty Pins converts pin data from Grow by Mediavine and Social Warfare. Instead of losing that data, convert it! Inside the Tasty Pins settings, you will see the Converter tab. Go ahead, check it out!
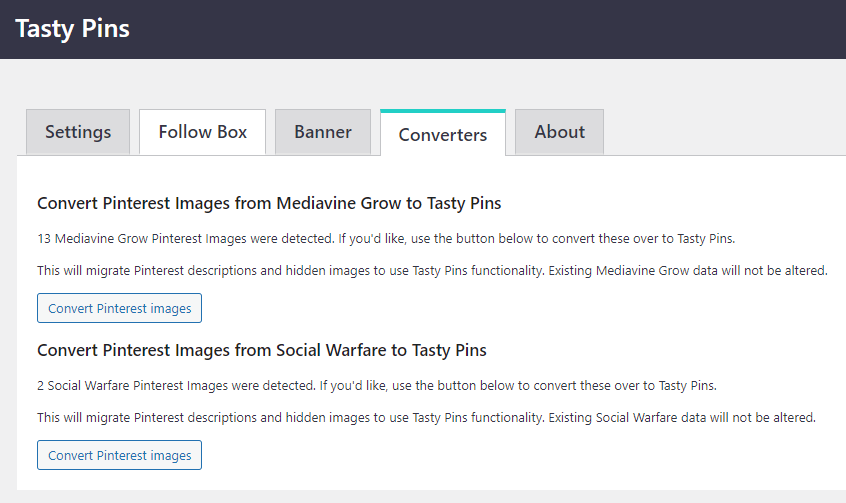
If you have Grow or Social Warfare, Tasty Pins will recognize the pin data on your images and offer to convert those for you.
Nervous about converting? Feel free to make a backup copy of your database in the unlikely event something gets lost in the process.
Learn more: How do I convert my Pinterest images from Mediavine Grow or Social Warfare?
Post Settings
Individual Image Settings
For each image in your post, Tasty Pins enables you to set a Pinterest Title and Description for your photos, separate from the alt text. This means that you can use your alt text for what it's intended – describing the image for screen readers and search results – while still providing an optimized description for Pinterest.
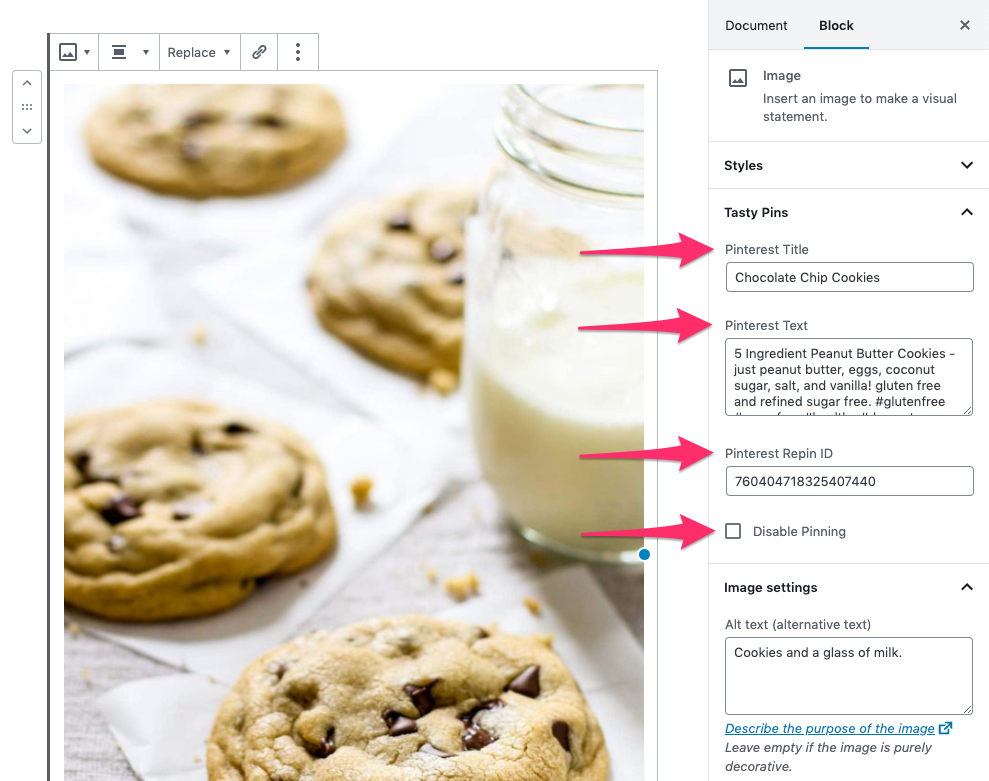
Pinterest Title: Pinterest is still in the process of rolling out support for Pinterest titles. We optimized Tasty Pins for compatibility with Pinterest titles in the future and compatibility with current Tailwind features.
Learn more: Pinterest Titles
Pinterest Text: The Pinterest text field sets the text that appears below a pin on Pinterest. The Pinterest text should entice the Pinterest user to click the image and visit your website.
Learn more: Adding Pinterest Text to your images, Writing great Pinterest descriptions, and How Pinterest Uses Your Custom Descriptions and Titles
Repin ID: With Tasty Pins, you can add a Repin ID to your images to help boost the number of repins for images already on Pinterest.
Learn more: Pinterest Repins and how to make them work for you.
Disable Pinning: Pinterest recommends a vertical 2:3 image ratio for pins, so this is an excellent opportunity to disable those horizontal images or other images that may not be ideal for Pinterest.
Learn more: What does it mean to disable pinning on certain images?
Hidden Image Settings
Some images are great for Pinterest, but they don't look that great on your site. Add these as hidden images to your page, and they'll appear as an option when readers go to save your content to Pinterest using a multi-select pin tool, including the Tailwind or Pinterest browser extensions.
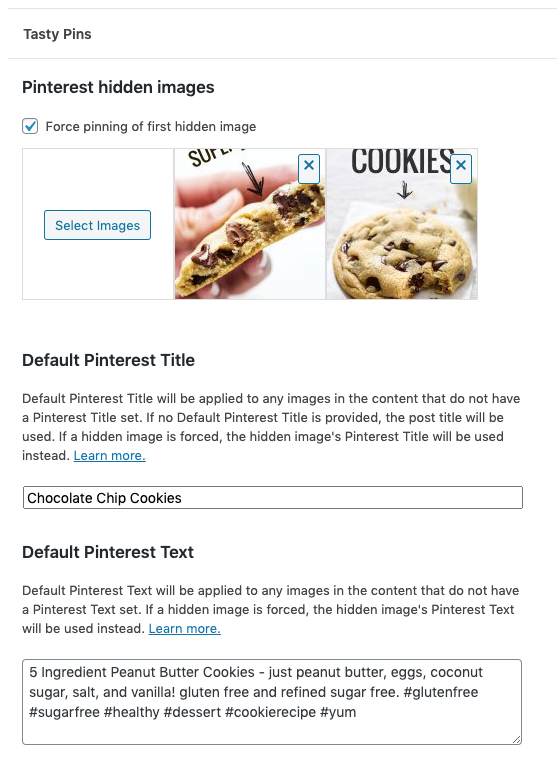
Force-pin: the hidden image will be used. Other post images are disabled for pinning when it's saved to Pinterest using a Tasty Pins hover button or a multi-select pin tool, including the Tailwind or Pinterest browser extensions.
Learn more about adding hidden images and force-pinning hidden images.
Default pin titles and descriptions: These are the titles and descriptions used for any image that does not already have a title or description set. It’s a real timesaver if all of your post images have the same information. You can just set them here one time and not worry about the rest.
So that’s a wrap on Tasty Pins! If you have any other questions, please reach out to our support team for help.
Troubleshooting
When you pin a new post on Pinterest and try to view it immediately, you may experience a delay before the title and description of the pinned post are displayed. This delay occurs because of caching on Pinterest's side.