
No matter your niche in affiliate marketing, there's one thing you must know: how to add affiliate disclosures to WordPress.
It's not just about being open and honest with your audience about making money. Disclosure statements are a legal requirement. And, if you don't follow these guidelines, there are serious risks like legal penalties, loss of audience trust, and damage to your reputation.
And you definitely don't want that!
But let's face it, manually adding these disclosures throughout your site involves endless copying and pasting. It's tedious and time-consuming. But does it have to be?
Keep reading for our step-by-step guide to keeping your blog transparent and compliant!
Understanding affiliate disclosures
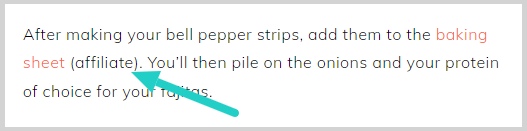
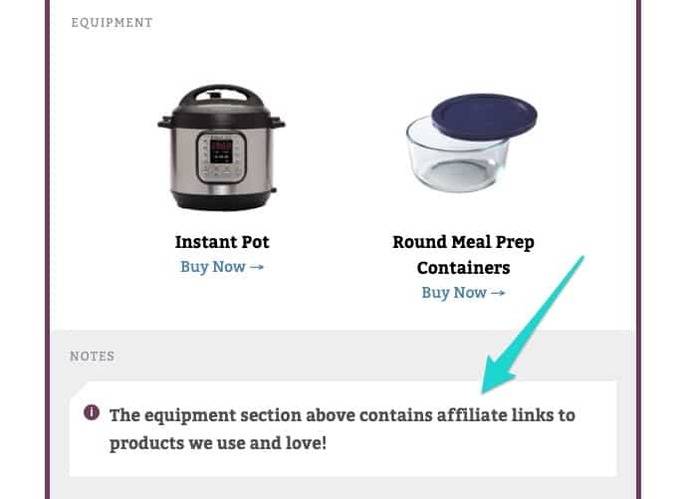
Affiliate disclosures are short statements in your posts or on specific affiliate disclosure pages that tell your readers whenever a post includes affiliate links.
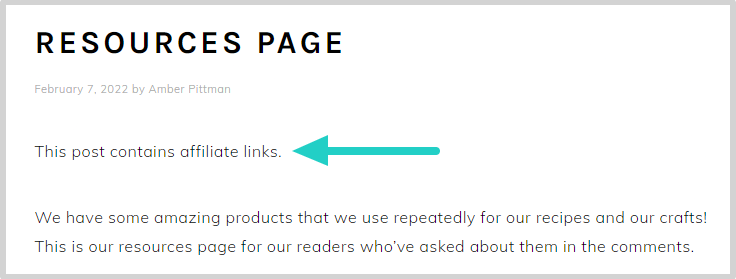
Take a look at the example below. It's a simple sentence letting the reader know that there are affiliate links within this “Resources Page” post.
But why is it important to tell your readers about these links?
Well, it's to be upfront that you might earn money if they click on these links and make a purchase. But, the need for these disclosures isn't just to keep a good reputation.
It's a legal requirement.
In the U.S., the Federal Trade Commission (FTC) makes these guidelines so there's transparency in digital marketing. Similar laws exist globally for consumer protection and honesty in online advertising.
So, whether your readers are from New York or New Delhi, these disclosures help build trust and prove you're committed to ethical writing.
How to add affiliate disclosures to WordPress
You can add affiliate disclosures to your WordPress blog posts a few different ways.
For the hands-on bloggers, there's the manual route. Just create your affiliate disclosure and type it into each post. This is as straightforward as it gets. Here, you're free to write and place your disclosure exactly how you want it.
The trade-off? You have to type it for each new post or link.
Another option is using shortcodes.
This is a real time-saver compared to the manual way. You create a shortcode for your disclosure, and WordPress automatically fills in your full disclosure text in your posts. It's quick and keeps things consistent.
But there is a catch. If you ever need to update your disclosure, you have to go back and edit the shortcode itself, which gets technical and time-consuming.
And, when you’ve got a lot of ground to cover, manually adding disclosures or learning about shortcodes is overwhelming. That’s why we recommend Tasty Links to take some stress off your plate.
Tasty Links automatically adds your disclosures across your content, saving you time and effort while keeping things neat and legal.
Now, let's understand exactly how Tasty Links makes adding FTC disclosures a breeze.
1. Download, install, & activate Tasty Links
Head over to our pricing page and download the Tasty Links WordPress plugin.
After you purchase Tasty Links, you'll get an email with all the juicy details! The first thing you'll need in that email is the link to your downloads page. From there, log into your WP Tasty account, hit the “Downloads” section, and grab the .zip file plugin.
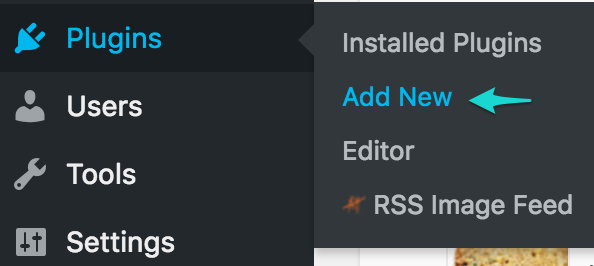
Next, go to your WordPress dashboard and click Plugins → Add New → Upload Plugin.
Now, select the Tasty Links file you downloaded, and click Install Now → Activate Plugin.
It's license key time! This number is in your confirmation email and your WP Tasty account dashboard. Copy it, head back to your dashboard, go to the WP Tasty menu, and paste your license key.
And just like that, you’re ready to roll!
2. Create a new Tasty Link
Now that Tasty Links is running, let's create a Tasty Link that includes your disclosure.
In your WordPress site's dashboard, make your way to the Tasty Links section and click on Add New.
This is where the fun begins!
Enter your keyword, affiliate link, and choose the options to customize your link.
Need a further breakdown on creating a new Tasty Link? Use our helpful guide, or check out the picture below on creating a Tasty Link.
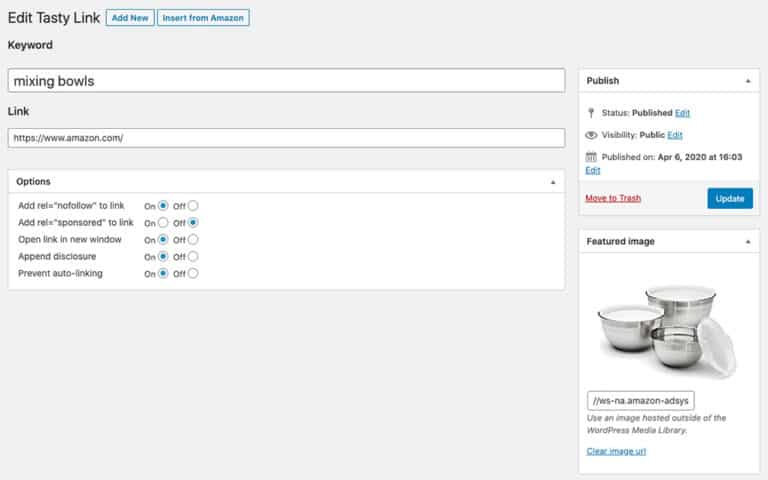
On this page, you’ll also need to turn “Append disclosure” to “On” to apply disclosure settings to that link automatically.
Remember, the disclosure setting is set on a per-link basis, so it’s turned on or off for each specific keyword.
3. Customize disclosure settings
Tasty Links makes it super easy to customize these disclosures to align with your blog’s voice and style.
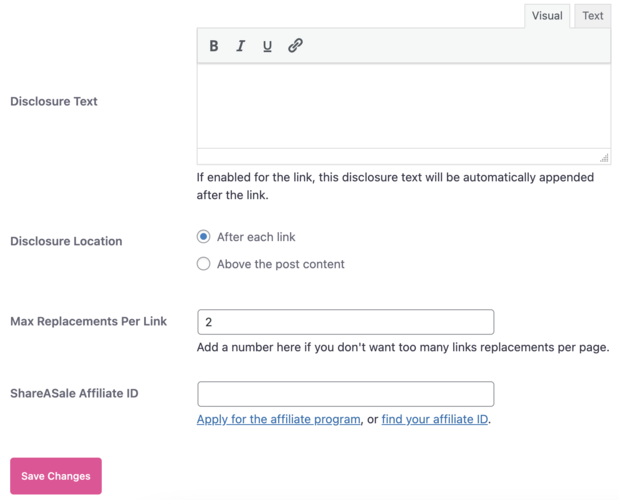
To do that, go to Tasty Links → Settings from your WordPress dashboard.
Once you're there, you have options. Edit your disclosure text and its location. But that's not all! You can add a ShareASale Affiliate ID for even more earnings! But we'll get to that later.
4. Write your disclosure
Now, let's talk about writing an affiliate disclosure. These little snippets are super important.
Why's that, you ask?
They keep things clear with your readers and ensure you're playing by the rules.
Whether you go for a simple and direct “This post contains affiliate links” or something that echoes your blog's unique voice is up to you.
Play around with the wording until it feels just right for your audience, but keep these things in mind:
- Keep it simple: Let your readers know you might get cash from those links.
- Match your style: Your blog has personality, and so should your disclosures. Whether you're cheeky, serious, or somewhere in between, let it show!
- Amazon affiliates, listen up: Got Amazon links? Use their special phrase, “As an Amazon Associate, I earn from qualifying purchases,” as Amazon's guidelines require it.
- Stay consistent: Keep your disclosures consistent and easy to understand across your posts.
5. Decide where to put your affiliate disclosures
Wondering where exactly to put your affiliate link disclosures?
Typically, two prime spots work effectively: at the top of your post or right after each affiliate link.
Putting the disclosure at the beginning of your posts makes it one of the first things your readers see. That way, you're open and honest from the start. If you don't want to put it there, you can put the disclosure near each affiliate link to tie the information directly to the recommendation.
Ultimately, keep your disclosures in plain sight, not tucked away or hidden. This way, you're following the law and building trust with your audience.
Here's a pro tip: if you bundle Tasty Links and Tasty Recipes, you can add affiliate links and disclosures to your recipe cards, too!
6. Add your ShareASale Affiliate ID (optional)
As we mentioned in Step 3, the last line on your disclosure settings lets you add your ShareASale affiliate ID.
If you're an affiliate for WP Tasty, you can add your ID here for easy affiliating.
Doing this automatically adds the following call-to-action at the bottom of your Featured Links blocks. So, if someone clicks on that block and signs up for the plugin, you get paid!

If you aren’t part of the affiliate program yet, you can sign up here! As a WP Tasty affiliate, you’ll receive a 30% commission (plus 30% for every month they remain a paying member) whenever your site visitors sign up via your link.
6. Styling the disclaimer (optional)
Once you've got your disclosures down, styling them to fit your WordPress theme is super simple with Tasty Links.
Tasty Links gives each disclosure its own CSS class, making it easy to style them the way you want.
To do this, go to your WordPress dashboard and click Appearance → Customize → Additional CSS section of your WordPress dashboard.
From there, you can target the disclaimer class for styling.
Let's say you want your disclosures to have a hint of aquamarine. Just a few lines of CSS like the ones below will get you there!
.tasty-links-general-disclaimer {
    color: aquamarine;
    opacity: 0.8;
}
7. Additional styling settings (optional)
If you're using Tasty Recipes along with Tasty Links, you have an extra little trick up your sleeve.
Want your affiliate disclosure right under your post title? Tasty Links includes a filter to do just that! It's like setting up the perfect welcome mat for your post. It's an approach that readers can't miss.
Just add the following snippet to your theme's functions.php file:
/**
* Move the Tasty Links disclaimer above Tasty Recipes' Jump To links.
*/
add_filter(
    'the_content',
    function( $content ) {
        if ( false === stripos( $content, '<div class="tasty-links-general-disclaimer">' ) ) {
            return $content;
        }
        // Remove the existing disclaimer text.
        $content = preg_replace( '#<div class="tasty-links-general-disclaimer">(.+)</div>#Us', '', $content );
        // Add the disclaimer text again.
        $content = Tasty_Links\Frontend::append_or_prepend_disclosure_to_content( $content );
        return $content;
    },
    1000
);
Think these last few steps involving code sound complicated?
Don't worry! These changes aren't necessary. They're a bonus! So feel free to skip them or come back later to learn more.
Note: This post was written to explain how to add an affiliate disclaimer in WordPress rather than social media platforms. Affiliate disclosure guidelines for other sources, such as social media, will be different than what we have shared above.
How will you simplify your affiliate strategy?
You've navigated the ins and outs of adding affiliate disclosures like a champ!
Whether you're crafting each disclosure by hand or letting Tasty Links automate the process, your blog is set to shine. So, showcase those amazing products and services you love in your posts!
And remember, at WP Tasty, we're here to help. Our stellar support team and the WP Tasty Help Center have your back every step of the way.
Here's to your blogging success, to make things simpler, and to keep it real with your audience!